The moment you decide to put a company name on a set of overalls, the fabric fights back a little. Canvas duck, poly-cotton twill, and flame-resistant blends are heavier and more textured than a t-shirt, and that changes which decoration method actually holds up. A logo that looks crisp on a polo can pucker on a bib front or crack across a coverall shoulder after a few industrial wash cycles. Choosing between embroidery, screen printing, and patches is less about looks and more about matching the method to the garment, the wash schedule, and the quantity you are ordering.
Embroidery: the default for heavy workwear
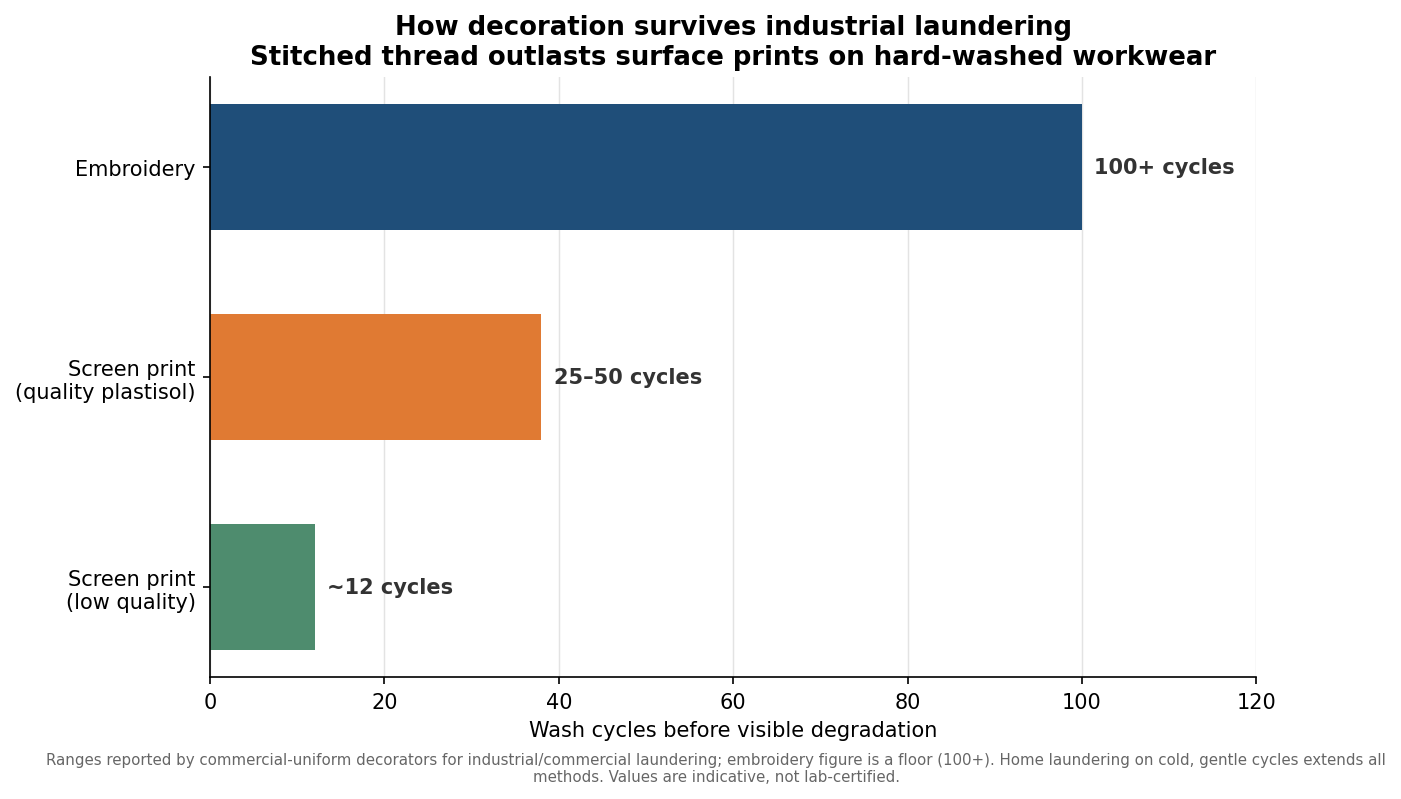
Embroidery is usually the right first guess for overalls and coveralls because stitched thread behaves well on thick, structured fabric. The needle passes through the cloth and locks to a backing underneath, so the design becomes part of the garment rather than a layer sitting on top of it. On workwear that gets washed hard, that matters: decorator shops that run commercial uniform programs report embroidered left-chest logos surviving 100 or more industrial wash cycles without cracking or fading, and holding up for the practical life of the garment under normal home laundering.
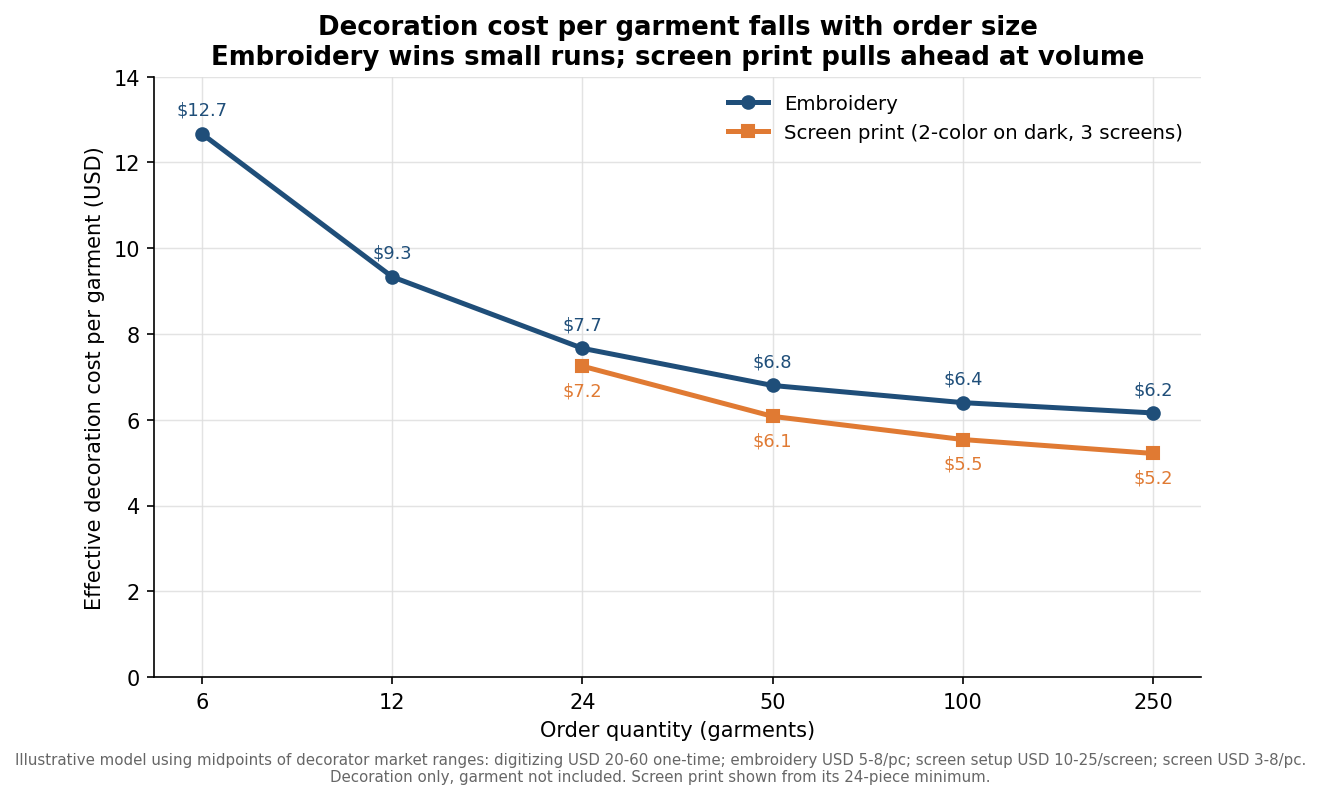
The cost structure is worth understanding before you order. Embroidery is priced in two parts. There is a one-time digitizing fee to convert your artwork into a stitch file, commonly in the range of $20 to $60, paid once and then stored for reorders. After that, the per-piece charge is driven by stitch count rather than color count, often quoted around $1 to $3 per thousand stitches, which lands a typical simple-to-moderate left-chest logo somewhere near $5 to $8 per garment. Because modern machines switch thread colors automatically, a multi-color mark generally costs the same as a single color, so a detailed crest is not penalized the way it would be in screen printing. The real constraints are resolution and size: fine details below about an eighth of an inch and text under roughly a quarter-inch tall tend to fill in or distort, so small taglines and thin serifs should be simplified.
Screen printing and heat transfer: when flat and colorful wins
Screen printing earns its place when the design is large, colorful, or needs to sit flat—a big back print announcing a crew name, or a bright graphic that would be impractical to stitch. Ink lays down smoothly on the flatter panels of a coverall, and at volume it is inexpensive per piece. The catch on workwear is durability and setup economics. Each color requires its own screen, typically $10 to $25 to set up, and printing on a dark garment adds a white underbase layer, so a two-color logo on navy coveralls really means three screens. That front-loaded cost is why screen printers usually set minimums around 24 pieces.
Durability is the bigger caution on garments headed for industrial laundering. A quality plastisol print holds up for roughly 25 to 50 commercial wash cycles before visible cracking begins, and a poorly cured or thin print can start failing in as few as a dozen washes. That is fine for uniforms replaced on a regular cycle, and less ideal for coveralls you expect to keep for years. Heat-transfer and vinyl methods sit in a similar bucket: quick, sharp, good for names and numbers, but a surface layer that generally will not match stitched thread for longevity on hard-used workwear.
Patches: the flexible middle path
A patch decouples decoration from the garment, which solves several workwear problems at once. You can produce embroidered, woven, or PVC patches in bulk, then attach them by stitching, heat-sealing, or hook-and-loop backing. Woven patches carry finer detail than direct embroidery because the threads are thinner, so a logo with small text or a gradient often reproduces better as a patch than stitched straight onto canvas. Hook-and-loop backing is the quiet advantage for rental fleets and multi-role crews: a name or role patch can be swapped without touching the coverall, which is common practice in mechanic bays, motorsport, and industrial settings.
The trade-off is the attachment. A patch is only as durable as its edge. An edge-stitched or heat-sealed patch on a stable base fabric can outlast the garment, while a lightly tacked or adhesive-only patch can lift at the corners after repeated washing and drying. If you go the patch route for coveralls that see solvents, heat, or heavy laundering, specify a stitched or sewn-down edge rather than relying on adhesive alone.
Match the method to the fabric and the wash schedule
Before choosing, look at what the garment is and how it will be cleaned. A structured canvas bib overall such as the AS Colour 5980, which comes in colorways like black and walnut across a standard S to XL run, takes embroidery cleanly on the chest and bib pocket. Its matching 5981 canvas coverall in navy, sized through 2XL, gives you flat back and chest panels that suit either a stitched crest or a larger printed graphic. For flame-resistant coveralls the decision is narrower and safety-driven: any decoration has to be compatible with the FR system, which typically means FR-rated thread and approved placement so you do not compromise the certification—a topic worth handling separately from ordinary workwear.
Laundering is the deciding variable people most often overlook. If garments go through a commercial or industrial wash, lean toward embroidery or edge-stitched patches, because that environment is exactly where surface prints degrade fastest. If the crew launders at home on cold, gentle cycles, screen printing and heat transfer last considerably longer and the durability gap narrows.
Spec it so your decorator can run it without a phone call
A clean spec sheet is what separates a smooth reorder from a proofing back-and-forth. Give the decorator vector artwork—an AI, EPS, or PDF file—rather than a low-resolution JPG pulled from a website, because vector art scales without blur and drops straight into digitizing or color separation. Name the exact garment and color so the shop can plan underbase and thread contrast; a light logo on walnut canvas needs different handling than the same logo on navy.
Then pin down placement and size in inches. The workwear convention for a chest logo is about 3.5 to 4 inches wide, kept under roughly a 4-by-4-inch box, positioned on the wearer’s left chest; full back graphics commonly run up to about 14 by 18 inches. State the method, the placement, the dimensions, the thread or ink colors by reference number, and the total quantity per size. When you can also flag the intended wash environment, a good decorator will steer you toward the method that survives it. Get those details on one page and your first run and every reorder after it come back the way you drew them.